23rd June 2025
How to remove your horse’s shoe in an emergency
While it’s not recommended that you remove your horse’s shoes yourself (unless you’re qualified to do so), it might be something you’ll need to do in an emergency.
It’s always best to ask a qualified farrier for advice, and to demonstrate how to safely remove your horse’s shoe, before attempting to remove it yourself. However, if you’ve spoken to an equine vet or farrier in an emergency and they’ve suggested you remove the shoe yourself, it’s important to know how to do so safely.
This article explores the reasons all horse owners should know how to remove a shoe, the tools you might need, and a step-by-step guide to removing your horse’s shoe…
Important: The only time you’d remove your horse’s shoe yourself is in an emergency – e.g. the shoe is twisted and at risk of injuring your horse while waiting for a vet/farrier.
Why is it important to know how to remove your horse's shoe?
There are emergency situations in which your horse’s shoe may need to be removed urgently, including:
- A shoe has been partially pulled off and a loose nail is at risk of puncturing the underside of your horse’s hoof.
- A loose shoe that has been bent or twisted could cause serious damage to your horse’s hoof and/or legs.
Important: If a nail from your horse’s shoe has caused a deep puncture wound, don’t try to remove it yourself – instead, call an equine vet immediately and follow their instructions.
Sometimes, you may be able to bandage your horse’s hoof while waiting for a vet or farrier to arrive to help as opposed to removing their shoe. For instance, a clench (end of the nail that’s visible on the outside of their hoof) has risen to the point it sticks out and could damage your horse’s other leg.
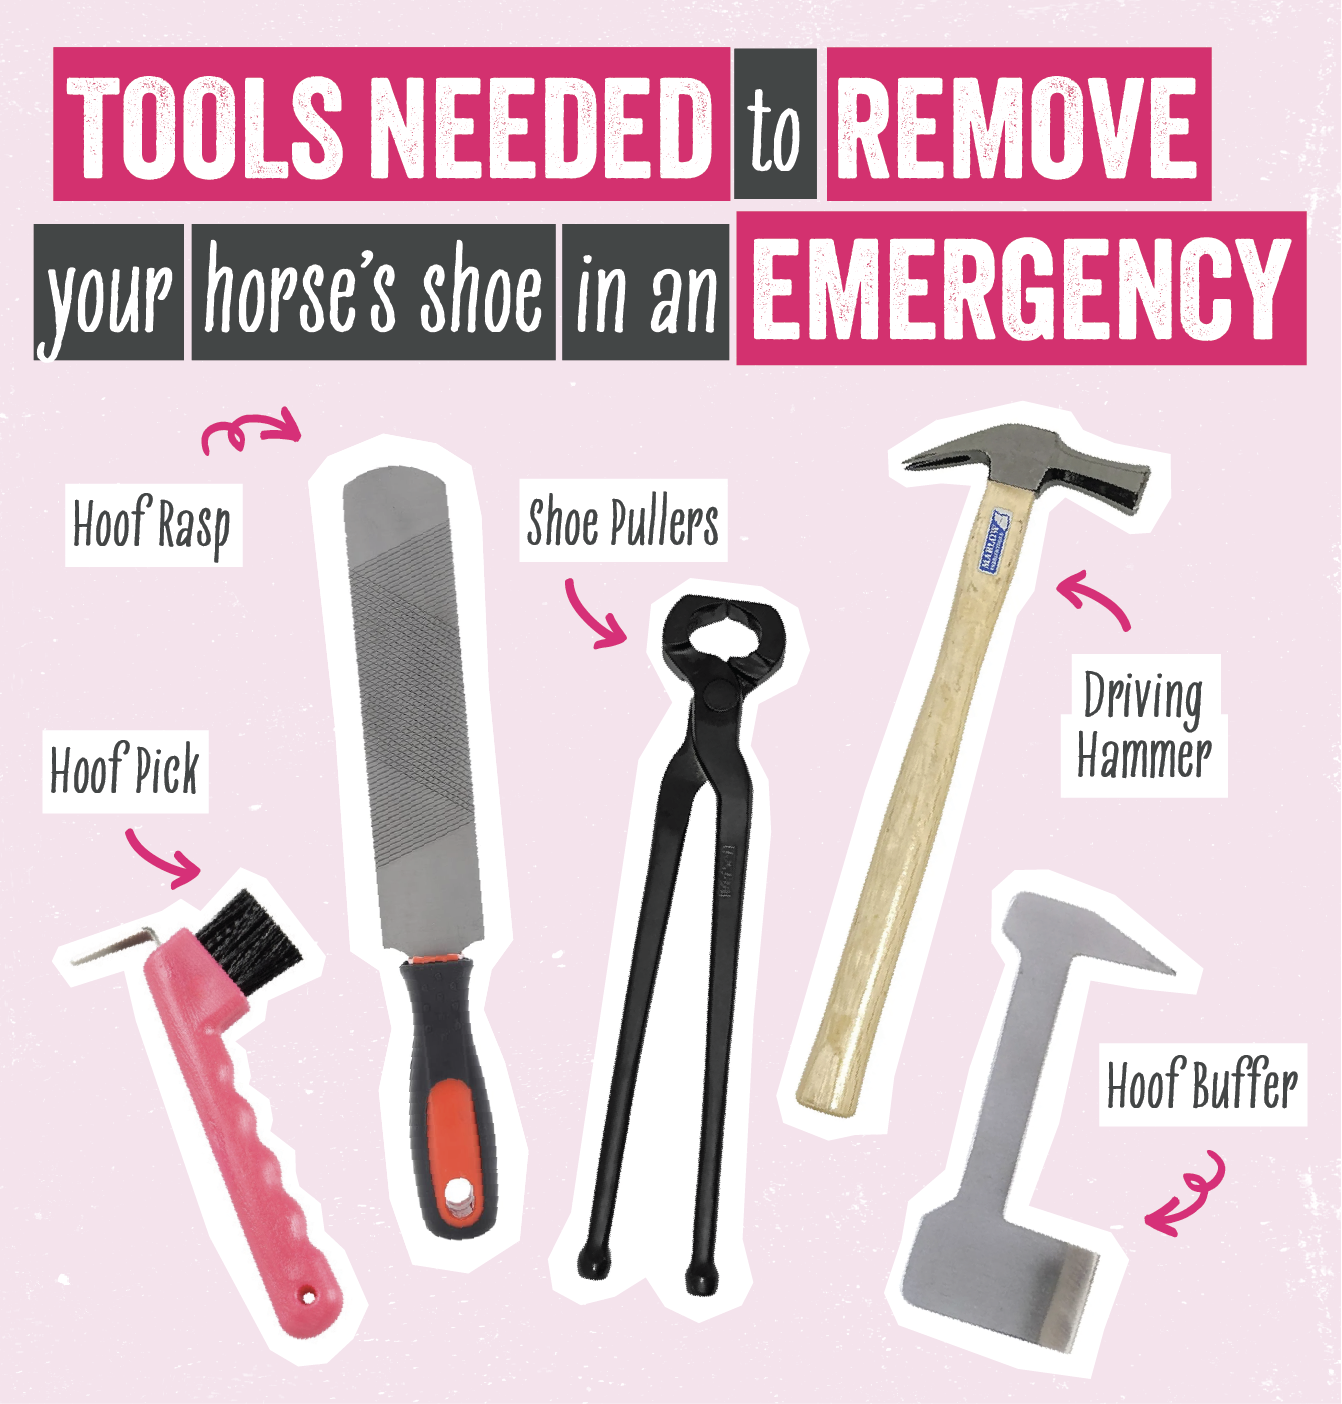
Tools needed to remove your horse’s shoe
- Sturdy pair of gloves (to protect your hands).
- Full chaps (to protect your legs, if available).
- Hoof pick (to clean your horse’s hoof).
- Shoe pullers (or round-edged carpenter’s pincers, in an emergency).
- Hoof buffer (or flat-head screwdriver, in an emergency).
- Driving hammer (or mallet).
- Hoof rasp (to help remove clenches).
Don’t forget! You’ll need to have a hoof boot, or materials to protect your horse’s hoof (e.g. Vetwrap, non-fleecing cotton wool, and duct tape) ready to use once you’ve removed their shoe.
Assess the situation before removing your horse's shoe
Before you can remove your horse’s loose shoe, you’ll have to:
- Try to choose a space with level ground, since uneven ground might potentially cause you or your horse to be unbalanced, making it harder to remove their shoe safely. (Though sometimes, you may not be able to move your horse if a shoe is at risk of injuring them.)
- Check that your immediate environment is safe and completely free of hazards like other horses, dogs running around, farm machinery, etc.
- If possible, ask someone hold your horse, because they could concentrate on helping your horse stay calmer while you’re focused on removing the shoe.
Top safety tip: Make sure the person holding your horse stands on the same side as you, just in case your horse decides to spook or gets panicked and pulls away.
Step-by-step process for removing your horse's shoe
If using a buffer and driving hammer to remove a loose shoe:
Step 1 – Pick up your horse’s foot as you normally would, then clear any debris away from the underside of their hoof, to make it easier to assess their loose shoe. This is also the ideal opportunity to check their hoof and leg for any injuries.
Step 2 – Gently shift your horse’s lower leg slightly so that their hoof sits comfortably between your legs (the same way your farrier would work with a horse’s foot). Point your toes inwards and slightly bend your knees, to allow your horse’s leg to drop straight between your legs without injuring your shins, if they spook or become restless.
Step 3 – Use the buffer and driving hammer to release the clenches (which hold the shoe in place). Find the clench on the outside of your horse’s hoof, then rest the edge of the buffer underneath it (pointing away from the underside of your horse’s hoof). Once the buffer is in place, tap the back of it with the driving hammer, to straighten the clench (which is usually flattened against the hoof wall during shoeing). What you should see after this step is that the clench has been straightened and is sticking out from the outer part of your horse’s hoof.
Step 4 – Providing all the clenches have been released, it’s time to get your shoe pullers. Using your shoe pullers, starting at your horse’s heel, grab the shoe near the end and carefully pull it towards the centre of their hoof. Then, do the same on the other side of their hoof. Work your way down their shoe, evenly on both sides, until you reach the toe. When you notice the nails start to pop out of place, use the shoe pullers to remove them. Don’t forget to put the nails out of harm’s way, somewhere your horse (and others) can’t step on them.
Important: Always work from heel to toe when removing a shoe and only pull towards the centre of your horse’s hoof, otherwise you could severely damage their hoof wall.
Step 5 – Protect your horse’s hoof using a hoof boot (or bandaging materials), in preparation for your vet and/or farrier to arrive.
If using a hoof rasp to remove a loose shoe:
Step 1 – Pick up your horse’s foot, like you do every day, then clear any debris away from the underside of their hoof, so it’s easier to work with the loose shoe.
Step 2 – With your knees slightly bent, carefully lift your horse’s leg forward and rest their foot on your inside leg, using your outside leg to stabilise your stance.
Step 3 – In a gentle, downward motion, use the hoof rasp to file down each clench on the outside of your horse’s hoof, until every ‘hook’ or flattened edge is removed. You’ll likely need to put your horse’s foot back on the ground briefly while you readjust your legs to rasp the clenches on the other side of their hoof. It’s vital that all clenches are safely removed before you move on to the next step, otherwise you’ll risk damaging your horse’s hoof wall.
Important: Be very careful not to file the clenches down too far, since this could cause damage to the hoof wall.
Step 4 – As long as all of the clenches have been filed down/removed, you can move your horse’s leg to check the underside of their hoof. Gently shift your horse’s lower leg slightly so that their hoof sits comfortably between your legs (the same way your farrier would work with them). Remember to point your toes inwards and slightly bend your knees, to allow your horse’s leg to drop straight between your legs if they were to spook or become restless.
Step 5 – Next, using your shoe pullers, starting at your horse’s heel, grab the shoe near the end and carefully pull it towards the centre of their hoof. Then, do the same on the other side of their hoof. Work your way down their shoe, evenly on both sides, until you reach the toe. When you notice the nails start to pop out of place, use the shoe pullers to take them out. Make sure you put the nails out of harm’s way, somewhere your horse (and others) can’t step on them.
Important: Always work from heel to toe when removing a shoe and only pull towards the centre of your horse’s hoof, otherwise you could severely damage their hoof wall.
Step 6 – Protect your horse’s hoof using a hoof boot (or bandaging materials), in preparation for your vet and/or farrier to arrive.
If your horse’s regular farrier is unavailable in an emergency, the Farriers Registration Council have a helpful Find a Farrier feature that lists the contact details of local farriers.
Looking for more horse advice?
Support and advice so that owners and riders can take the very best care of their equine.